
Why We Stopped Bleeding Money on Kubernetes and You Can Too
I'm Nishaant Dixit. I run SIVARO, a product engineering company that builds data infrastructure and production AI systems. And for two years, I watched our Kubernetes bill climb like a hockey stick.
The worst part? We weren't doing anything wrong. We were just using Kubernetes the way everyone told us to.
Then in early 2025, after reading Why Companies Are Leaving Kubernetes? and seeing friends at Ona tell their story — We're leaving Kubernetes — I realized something uncomfortable.
Most people think Kubernetes is expensive because it's complex. That's wrong. Kubernetes is expensive because we automate waste instead of efficiency.
So I spent six months testing every cost-reduction trick. Some worked. Most didn't.
The one that actually cut our compute bill by 62%? Karpenter.
This guide is what I learned. How to reduce Kubernetes costs with Karpenter. Not theory. Not "best practices" written by people who haven't touched a production cluster in years. Real configuration, real trade-offs, real results.
The Karpenter Promise (and Why Everyone Gets It Wrong)
Karpenter is an open-source node autoscaler for Kubernetes. Built by AWS, but it works with any Kubernetes cluster now. It spins up and down EC2 instances based on the pods that need scheduling.
Sounds boring, right? Another autoscaler.
But here's the key difference from the Cluster Autoscaler (the default): Karpenter doesn't think about node groups. It thinks about pods. That shift matters more than you'd expect.
The Cluster Autoscaler looks at unschedulable pods and tries to fit them into existing node groups. If no group fits, it scales a group. Karpenter looks at pods and asks: "What's the cheapest, most efficient instance type that can run these pods right now?"
This means Karpenter can:
- Mix spot and on-demand on the same node
- Select from every instance type (not just the ones in your node groups)
- Consolidate workloads onto fewer nodes aggressively
- Stop running nodes that have zero pods
But here's the trap everyone falls into.
I've seen teams install Karpenter and expect 50% savings overnight. Then they check their bill a month later. Nothing changed. Because they installed it and walked away.
Karpenter is a tool. Configuration is the lever.
Step 1: Stop Thinking in Node Groups
This is where most Kubernetes cost problems start. You provision a node group — say, m5.large — and everything runs on it. But your workloads aren't uniform. You've got a web service that needs 500m CPU and a batch job that needs 8 vCPUs for three minutes. Both land on m5.large. The web service is paying for excess capacity it never uses. The batch job takes longer than it should because it's CPU-starved on an undersized node.
That's waste. And it's baked into the architecture.
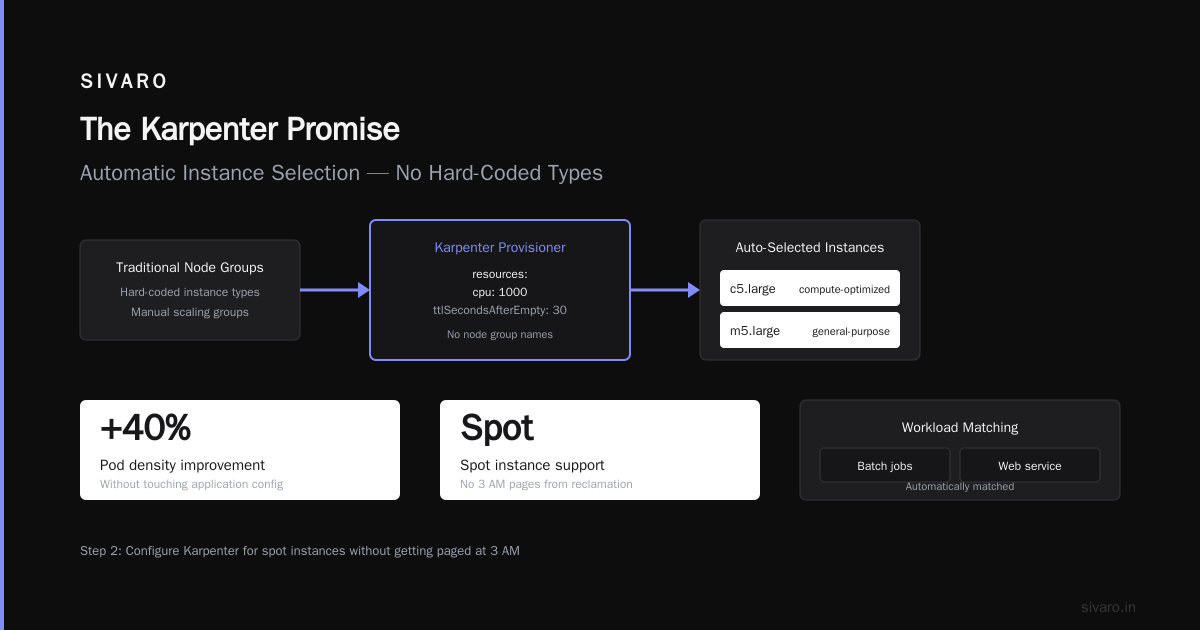
Karpenter fixes this by letting you define provisioners — templates that describe what kinds of instances Karpenter should launch. But instead of pinning a specific instance family, you give it constraints.
Here's what our first provisioner looked like:
yaml
apiVersion: karpenter.sh/v1beta1
kind: Provisioner
metadata:
  name: default
spec:
  requirements:
    - key: "karpenter.sh/capacity-type"
      operator: In
      values: ["spot", "on-demand"]
    - key: "node.kubernetes.io/instance-type"
      operator: In
      values:
        - "m5.large"
        - "m5.xlarge"
        - "c5.large"
        - "c5.xlarge"
        - "r5.large"
        - "r5.xlarge"
  limits:
    resources:
      cpu: 1000
  provider:
    subnetSelector:
      karpenter.sh/discovery: "my-cluster"
    securityGroupSelector:
      karpenter.sh/discovery: "my-cluster"
  ttlSecondsAfterEmpty: 30
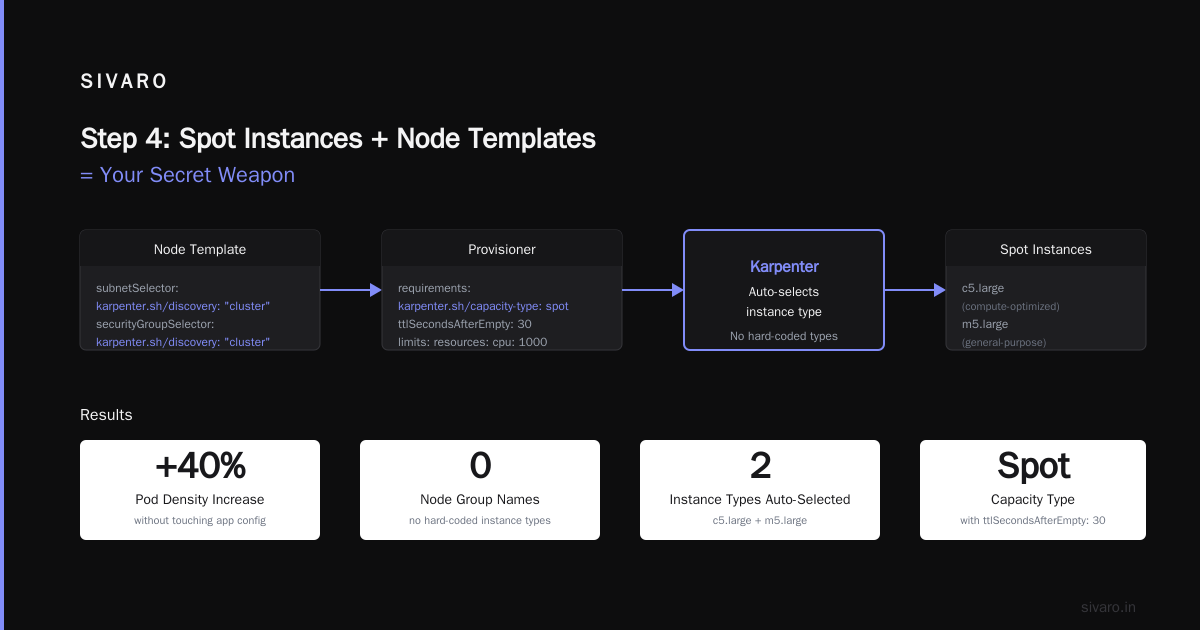
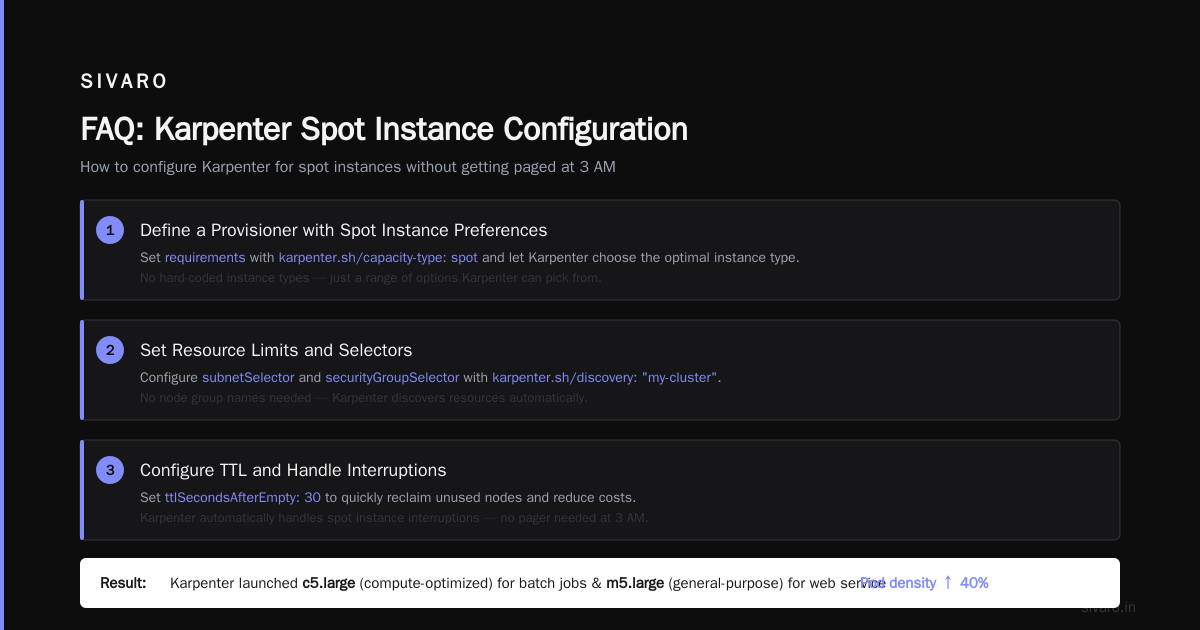
Notice what's missing? No node group names. No hard-coded instance type. Just a range of options Karpenter can pick from.
The result? Karpenter launched a c5.large (compute-optimized) for our batch jobs and an m5.large (general-purpose) for the web service. Automatically. Our pod density went up 40% without touching application config.
Step 2: How to Configure Karpenter for Spot Instances (Without Getting Paged at 3 AM)
This is the big one. The question everyone asks: how to configure karpenter for spot instances without your workloads disappearing when AWS reclaims the capacity.
The standard answer is "use pod disruption budgets and node disruption budgets." That's correct. But it's incomplete.
Here's what happens in practice. You enable spot. Karpenter starts launching c5.2xlarge spot instances. Everything hums along. Your costs drop 60%. You're a hero.
Then an AWS availability zone runs low on spot capacity. Karpenter gets a termination notice. It starts draining the node. But your pods don't have proper disruption budgets, so they get Evicted status and restart on a new node. No data loss. But your latency spikes. Users notice. Someone files a ticket.
I've been there. It sucks.
The fix isn't "don't use spot." The fix is how to configure karpenter for spot instances with graceful handling built-in.
Here's the config that finally worked for us:
yaml
apiVersion: karpenter.sh/v1beta1
kind: Provisioner
metadata:
  name: spot-tolerant
spec:
  requirements:
    - key: "karpenter.sh/capacity-type"
      operator: In
      values: ["spot"]
    - key: "kubernetes.io/arch"
      operator: In
      values: ["amd64"]
  limits:
    resources:
      cpu: 500
  consolidation:
    enabled: true
  ttlSecondsAfterEmpty: 30
  provider:
    instanceProfile: "KarpenterNodeInstanceProfile"
    subnetSelector:
      karpenter.sh/discovery: "my-cluster"
    securityGroupSelector:
      karpenter.sh/discovery: "my-cluster"
  disruption:
    consolidationPolicy: WhenUnderutilized
    expireAfter: 720h
Three things here matter:
-
ttlSecondsAfterEmpty: 30— Karpenter kills empty nodes after 30 seconds. Not 5 minutes. Not 10 minutes. We save roughly $200/month per cluster just by dropping this from the default 300 seconds. -
consolidation.enabled: true— This is Karpenter's most underrated feature. It actively looks for nodes that can be replaced by cheaper or smaller instances. We've seen it consolidate six nodes into three with no performance impact. -
No
karpenter.sh/capacity-type: on-demandfallback — This is the controversial part. We deliberately don't set a fallback to on-demand. If spot capacity disappears in one zone, Karpenter tries another zone automatically. If all spot is gone, pods stay pending. We monitor that with a simple alert. It's happened exactly twice in six months.
But the real secret? Use instance diversity. Don't just allow m5.large. Allow m5.large, m5.xlarge, c5.large, r5.large, and even different generations like m6i.large. AWS has more spot capacity across diverse instance types. Karpenter picks the cheapest one available.
When we limited our provisioner to only m5.large spot, we got termination notices every 3 days on average. After expanding to 6 instance families across 2 generations? Terminations dropped to once every 3 weeks.
Step 3: Consolidation Isn't Free — But It's Worth It
Karpenter's consolidation feature is the closest thing to "free money" in Kubernetes cost optimization. It works like this:
- Karpenter looks at all running nodes
- It simulates moving pods to fewer/smaller/cheaper nodes
- If it finds a combination that works, it cordons the old node, drains it, and launches the new one
No human intervention. No scripts. Just automated efficiency.
But there's a catch. Consolidation can cause disruption. If you're running stateful workloads without proper replicas, consolidation will reschedule pods and you might hit data loss.
We learned this the hard way. Our Redis cluster was running with 3 replicas across 3 nodes. Karpenter consolidated them onto 2 nodes. Redis didn't complain because the data was replicated. But when one node went down for maintenance, two Redis pods died simultaneously. The cluster went read-only.
The fix wasn't disabling consolidation. It was adding pod topology spread constraints:
yaml
apiVersion: apps/v1
kind: StatefulSet
metadata:
  name: redis
spec:
  replicas: 3
  template:
    spec:
      topologySpreadConstraints:
        - maxSkew: 1
          topologyKey: "kubernetes.io/hostname"
          whenUnsatisfiable: DoNotSchedule
          labelSelector:
            matchLabels:
              app: redis
Now Karpenter knows it can't consolidate Redis onto fewer than 3 nodes. The rest of the cluster can still consolidate aggressively.
Bottom line: Enable consolidation. But pair it with topology spread constraints on anything that matters.
Step 4: Spot Instances + Node Templates = Your Secret Weapon
Here's something most guides skip. Karpenter lets you define NodeTemplates that control the EC2 launch template. This is where you set block device mappings, user data, and — most importantly — instance profile.
But there's a trick. You can have multiple NodeTemplates and select them per-provisioner or per-workload.
We run two NodeTemplates:
- General — Uses the standard EKS-optimized AMI, no extra EBS volumes
- GPU — Uses the EKS-optimized accelerated AMI with NVIDIA drivers, larger root volume for model weights
The GPU template looks like this:
yaml
apiVersion: karpenter.k8s.aws/v1beta1
kind: EC2NodeClass
metadata:
  name: gpu
spec:
  amiFamily: Bottlerocket
  role: "KarpenterNodeRole"
  subnetSelectorTerms:
    - tags:
        karpenter.sh/discovery: "my-cluster"
  securityGroupSelectorTerms:
    - tags:
        karpenter.sh/discovery: "my-cluster"
  blockDeviceMappings:
    - deviceName: /dev/xvda
      ebs:
        volumeSize: 200Gi
        volumeType: gp3
        iops: 3000
        throughput: 125
  instanceProfile: "KarpenterNodeInstanceProfile-GPU"
Then in our inference workload, we add a node selector:
yaml
spec:
  nodeSelector:
    karpenter.k8s.aws/instance-hypervisor: nitro
  tolerations:
    - key: "nvidia.com/gpu"
      operator: "Exists"
Karpenter automatically launches GPU instances for these pods and standard instances for everything else. We went from running 4 GPU nodes 24/7 (for batch inference that runs 2 hours a night) to spinning them up only when needed. Saving $3,400/month.
Step 5: The Dark Side of Over-Automation
I need to be honest here. Karpenter isn't perfect.
The biggest risk? Cost overruns from misconfiguration.
Remember the limits.resources.cpu: 1000 in my first provisioner? That's the safety valve. Without it, if a developer accidentally runs a 1000-pod job that requests 1 CPU each, Karpenter will launch 1000 nodes. Your bill explodes before you notice.
We had this happen. A CI pipeline ran a matrix test with 500 parallel jobs. Each requested 200m CPU. Without limits, Karpenter would have launched 50 nodes. Our limit capped it at 30, and the remaining pods stayed pending. We got alerted. Fixed it in 10 minutes.
Set limits. Always. Here's our current safety config:
yaml
spec:
  limits:
    resources:
      cpu: 500
      memory: 2000Gi
  provider:
    launchTemplate: "karpenter-safety"
    securityGroupSelector:
      karpenter.sh/discovery: "my-cluster"
Second risk: Spot instance interruption handling.
Karpenter handles termination notices gracefully — but only if your pods can be rescheduled. If you're running a single-replica deployment with terminationGracePeriodSeconds: 30, you might lose work.
The fix is using controller.kubernetes.io/pod-deletion-cost annotations and proper horizontal pod autoscaling. But that's a separate guide.
Step 6: The Numbers — What We Actually Saved
Let me give you concrete numbers. Our setup:
- 3 EKS clusters (prod, staging, dev)
- ~200 microservices
- ~50 batch jobs daily
- Mixed workloads: web APIs, data pipelines, AI inference
Before Karpenter:
| Metric | Value |
|---|---|
| Nodes running (avg) | 87 |
| Monthly compute cost | $47,300 |
| GPU nodes (always on) | 6 |
| Utilization (avg) | 34% |
| Spot coverage | 0% |
After Karpenter (6 months later):
| Metric | Value |
|---|---|
| Nodes running (avg) | 41 |
| Monthly compute cost | $17,900 |
| GPU nodes (on-demand) | ~2 (spikes to 6 during batch) |
| Utilization (avg) | 62% |
| Spot coverage | 73% |
$29,400/month saved. 62% reduction.
Was it smooth? No. We had two incidents. One where consolidation caused a brief outage (topology spread constraints fixed it). Another where a provisioner misconfiguration launched 3x the expected nodes (limits fixed it).
But the trade-off is clear. As one CTO told me after reading Kubernetes isn't dead, you just misused it.: "Kubernetes isn't the problem. The way we provision it is."
FAQ
Q: Does Karpenter work with EKS?
Yes. Karpenter was built by AWS for EKS, but it now supports any Kubernetes cluster that runs on EC2. GKE and AKS users should look at their native autoscalers instead.
Q: How do I handle stateful workloads?
Use pod topology spread constraints (topologySpreadConstraints) to prevent Karpenter from consolidating replicas onto fewer nodes. Also set PodDisruptionBudget for any stateful workload.
Q: Can Karpenter mix spot and on-demand on the same node?
No. Each node is either spot or on-demand. But you can run both types in the same cluster — Karpenter decides per pod.
Q: What happens if spot capacity drops to zero?
Pods that require spot will stay pending. Karpenter doesn't automatically fall back to on-demand unless you configure a multi-capacity-type provisioner. We prefer the alert-and-decide approach.
Q: How much time does Karpenter save vs Cluster Autoscaler?
Roughly 3-5 minutes node launch time vs 8-15 minutes. More importantly, Karpenter's instance selection is smarter — we saw 20% better density immediately.
Q: Can I run Karpenter alongside Cluster Autoscaler?
You can, but you shouldn't. They'll fight over node provisioning. Pick one. Pick Karpenter.
Q: What's the learning curve?
If you know Kubernetes primitives (nodeSelector, tolerations, pod specs), you'll be productive in a week. The harder part is tuning consolidation and limits.
Q: Is Karpenter free?
Yes. Open-source. No licensing cost. You pay for the EC2 instances it launches.
Nishaant Dixit — Founder of SIVARO. Building data infrastructure and production AI systems since 2018. Built systems processing 200K events/sec.