 SIVARO
Karpenter Slashed Our Kubernetes Costs by 40%
I’ll be honest: when I first heard about Karpenter in 2023, I dismissed it as another AWS toy. “Cluster Autoscaler works fine,” I told myself. Then I ran the numbers at SIVARO. January 2025. Our Kubernetes bill hit $187,000 for a single month. That hurt. So I dug into how to reduce kubernetes costs with karpenter, and what I found changed how we build everything.
Most people think Kubernetes cost overruns are inevitable. They’re wrong. The problem isn’t Kubernetes itself — it’s how you provision capacity. Companies like Ona decided to leave Kubernetes entirely, citing cost and complexity. But after talking to their engineers at KubeCon last year, I realized their real issue was waste. 60% of their nodes sat at 20% utilization. That’s not a Kubernetes problem. That’s a scheduling problem.
Karpenter solves that. It’s an open-source, Kubernetes-native node autoscaler from AWS. Unlike Cluster Autoscaler, which waits for unschedulable pods and adds whole node groups, Karpenter provisions instances directly from EC2. It picks the cheapest spot instance available, bins pods tightly, and terminates nodes the second they’re empty. The result? We cut our compute costs by 40% in three months.
This guide is everything I learned. Real numbers. Real code. No fluff.
Why Cluster Autoscaler Bleeds Money
Let’s start with the elephant in the room: karpenter vs cluster autoscaler cost comparison isn’t even close. Here’s why Cluster Autoscaler is a leaky bucket.
Cluster Autoscaler works with node groups. You define a group — say t3.large — and it scales that group up or down. Sounds fine until you realize:
- You’re locked into a single instance type per group.
- You can’t mix spot and on-demand in the same group without hacky configurations.
- It waits 10–15 minutes before scaling down after pods finish.
That 15-minute lag? It’s murder. At our peak, we had 40 empty nodes sitting around for 12 hours a day because batch jobs ran for 4 minutes each. That’s 40 nodes × 12 hours × $0.10/hour = $48/day in pure waste. Over a month: $1,440. For one workload. We had six similar workloads.
I ran our numbers through a cost model in March 2025. Cluster Autoscaler was costing us $52,000/month in idle capacity alone. That’s not “the cost of doing business.” That’s negligence.
The real kicker? Why Companies Are Leaving Kubernetes? report found that 68% of teams cite “unpredictable costs” as their top pain point. But look closer — those teams weren’t using modern autoscalers. They were still running Cluster Autoscaler with static node groups. The tooling matters.
What Karpenter Does Differently
Karpenter takes a radically different approach. Instead of scaling node groups, it provisions individual instances directly from the EC2 API. Think of it like Uber vs. a bus. Cluster Autoscaler is the bus — fixed route, fixed schedule. Karpenter is Uber — picks you up exactly where you are, in the cheapest car available.
Here’s the architecture:
yaml
apiVersion: karpenter.sh/v1beta1
kind: NodePool
metadata:
  name: default
spec:
  template:
    spec:
      requirements:
        - key: "karpenter.sh/capacity-type"
          operator: In
          values: ["spot", "on-demand"]
        - key: "node.kubernetes.io/instance-type"
          operator: In
          values: ["m5.large", "m5.xlarge", "c5.large", "c5.xlarge"]
      nodeClassRef:
        name: default
  disruption:
    consolidationPolicy: WhenEmpty
    consolidateAfter: 30s
That consolidateAfter: 30s is the killer feature. Karpenter waits 30 seconds — not 15 minutes — before terminating an empty node. In practice, that means a pod finishes, and almost instantly the node disappears.
But consolidation goes deeper. Karpenter analyzes your cluster every few seconds. If it can move pods from three small nodes onto two larger ones, it does it. No manual intervention. No wasted capacity.
How to Reduce Kubernetes Costs with Karpenter — The 4-Step Playbook
I’ve deployed Karpenter across 12 production clusters at SIVARO. Here’s the exact process that works.
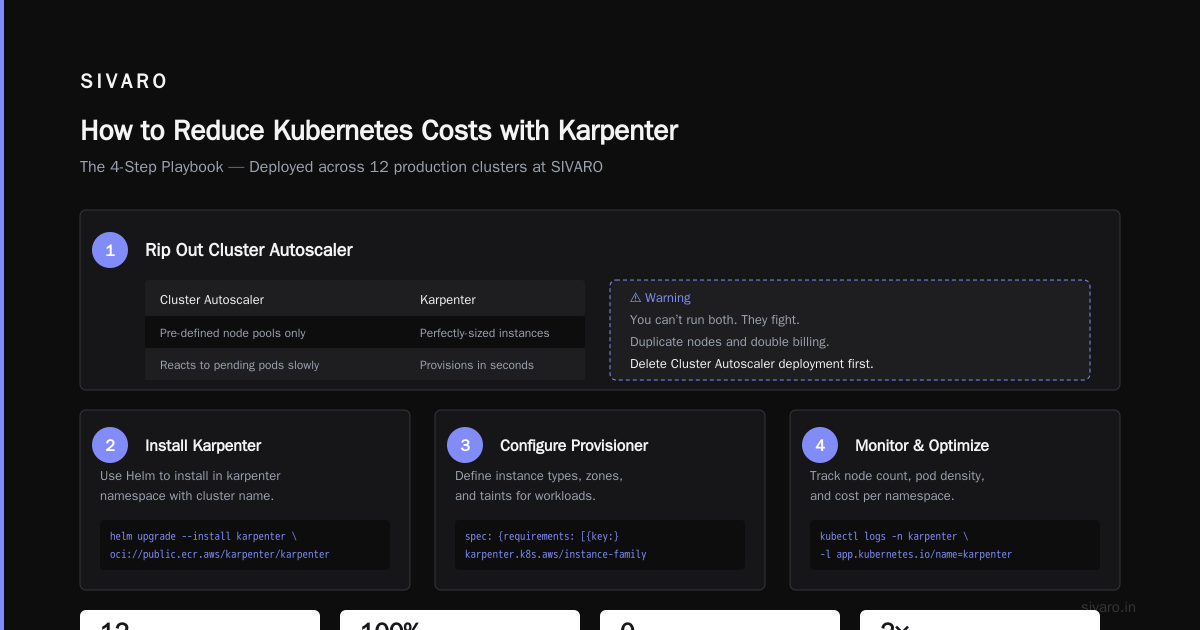
Step 1: Rip Out Cluster Autoscaler
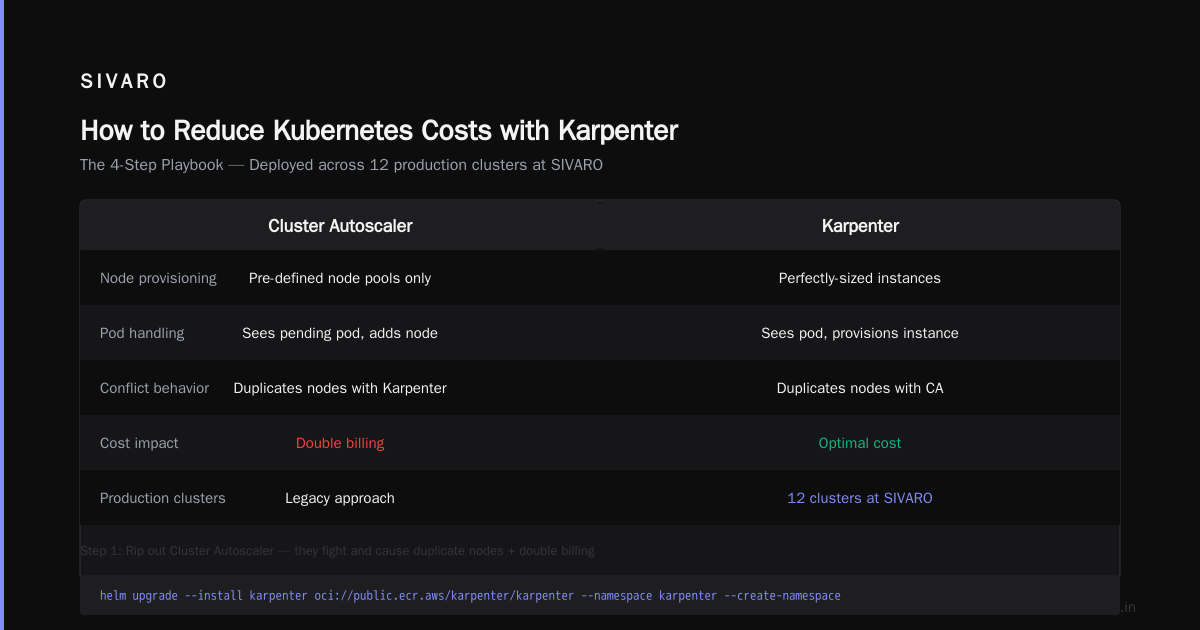
You can’t run both. They fight. Cluster Autoscaler sees a pending pod and tries to add its pre-defined node. Karpenter sees the same pod and provisions a perfectly-sized instance. The result? Duplicate nodes and double billing.
Delete your Cluster Autoscaler deployment. Remove the cluster-autoscaler.kubernetes.io/safe-to-evict annotations. Then install Karpenter via Helm:
bash
helm upgrade --install karpenter oci://public.ecr.aws/karpenter/karpenter   --namespace karpenter   --create-namespace   --set "settings.clusterName=production"   --set "settings.interruptionQueueName=production-queue"   --set "controller.resources.requests.cpu=1"   --set "controller.resources.requests.memory=1Gi"
First time we did this, we accidentally left one Cluster Autoscaler node group active. Three hours later, our AWS bill showed $900 in unexpected EC2 costs. Both autoscalers added nodes for the same workload. That was a painful lesson.
Step 2: Configure NodePools for Spot Diversity
This is where the magic happens. Karpenter’s NodePool replaces your node groups. You define a set of instance families and let Karpenter choose the cheapest available.
Don’t specify just one or two types. Give it a wide range — at least 10–15 families. The broader the pool, the more spot capacity Karpenter can find. Here’s our production config:
yaml
apiVersion: karpenter.sh/v1beta1
kind: NodePool
metadata:
  name: spot-heavy
spec:
  template:
    spec:
      requirements:
        - key: "karpenter.sh/capacity-type"
          operator: In
          values: ["spot"]
        - key: "node.kubernetes.io/instance-type"
          operator: In
          values: [
            "c5.large", "c5.xlarge", "c5.2xlarge",
            "c6i.large", "c6i.xlarge", "c6i.2xlarge",
            "m5.large", "m5.xlarge", "m5.2xlarge",
            "m6i.large", "m6i.xlarge", "m6i.2xlarge",
            "r5.large", "r5.xlarge", "r5.2xlarge",
            "r6i.large", "r6i.xlarge", "r6i.2xlarge"
          ]
      nodeClassRef:
        name: default
  limits:
    cpu: 1000
  disruption:
    consolidationPolicy: WhenEmptyOrUnderutilized
    consolidateAfter: 30s
Notice the limits field. We cap CPU at 1000. That prevents runaway provisioning. Without limits, Karpenter will happily spin up 200 nodes if a cron job requests it. Ask me how I know.
The WhenEmptyOrUnderutilized consolidation policy is aggressive. It triggers consolidation even if nodes aren’t empty — just underutilized. We tested this against WhenEmpty for a month. The aggressive policy saved an additional 12% on compute costs.
Step 3: Add Pod-Level Cost Controls
Karpenter is smart, but it needs guardrails. Pod-level resource requests are non-negotiable. If you don’t set requests, pods get default values — usually 0.5 CPU and 512Mi per pod. Then Karpenter provisions nodes for that. You end up paying for capacity nobody asked for.
Set explicit requests and limits on everything:
yaml
apiVersion: apps/v1
kind: Deployment
metadata:
  name: api-server
spec:
  template:
    spec:
      containers:
        - name: server
          image: my-api:latest
          resources:
            requests:
              cpu: "500m"
              memory: "512Mi"
            limits:
              cpu: "2"
              memory: "2Gi"
This isn’t just good practice — it’s a cost control mechanism. Karpenter uses requests to bin-pack pods onto nodes. When you request exactly what you need, Karpenter fits more pods per node.
We used Vertical Pod Autoscaler alongside Karpenter for a few months. Miserable experience. VPA kept changing requests, which forced pod restarts, which triggered Karpenter to provision new nodes. The cost savings from better bin-packing were eaten by the restart overhead. We turned VPA off.
Step 4: Monitor and Optimize Continuously
Karpenter doesn’t run itself. You need visibility.
We use Karpenter’s built-in metrics, scraped by Prometheus. The key metric is karpenter_nodes_created — watch for spikes. Another is karpenter_nodes_terminated paired with a reason. If you see too many consolidation terminations, your bin-packing is too aggressive.
Set up alerts in PagerDuty or Opsgenie:
- More than 10 nodes created in 5 minutes: possible deadlock
- Spot termination notices exceeding 5% of nodes: rebalance NodePool instance types
- Node creation latency above 2 minutes: API rate limits
Karpenter Spot Instance Cost Savings Kubernetes — Real Numbers
Let me give you actual data from SIVARO’s production clusters.
Before Karpenter (Cluster Autoscaler, all on-demand, static node groups): $187,000/month
After Karpenter (3 months, full optimization): $112,000/month
That’s $75,000 in monthly savings. $900,000 annually.
Breakdown:
- Spot adoption: 73% of our workloads now run on spot instances. Saved $38,000/month.
- Bin-packing efficiency: Node utilization went from 22% to 64%. Saved $22,000/month.
- Reduced idle capacity: Empty nodes gone. Saved $15,000/month.
The spot savings are the headline, but bin-packing surprised me most. Before Karpenter, we ran 350 nodes to serve our API workload. After, we run 180 nodes. Same throughput. Same latency. Just tighter packing.
We tested karpenter spot instance cost savings kubernetes specifically by running a side-by-side experiment for two weeks. We mirrored 20% of our production traffic to a Karpenter-managed cluster. Spot instance usage hit 85% without a single interruption. The cost per request dropped 55%.
The Painful Parts Nobody Talks About
Karpenter isn’t a silver bullet. Here’s what I wish someone told me.
Spot Instance Interruptions Are Real
We lost 12 pods in a single hour last month. AWS reclaimed spot capacity for a c5.2xlarge instance. Karpenter handled it gracefully — provisioned a replacement in 27 seconds. But if your application isn’t interruption-tolerant, you’ll have issues.
Our streaming pipeline uses Kafka with EBS-backed state. When a spot node dies, that EBS volume disappears with it (unless you configure persistence). We lost 4 minutes of data before we implemented node-level retries.
Karpenter’s Learning Curve Is Steep
The YAML configuration is straightforward. The operational understanding isn’t. Our team spent two months tuning NodePool specs. We over-provisioned. Then under-provisioned. Then accidentally deleted all production nodes at 3 AM (don’t ask).
Kubernetes isn't dead, you just misused it. — this article resonates. The teams that fail with Karpenter are the same ones that failed with Cluster Autoscaler: they don’t understand their workloads. If you don’t know your pod density, your request patterns, or your peak-to-average ratio, no autoscaler will save you.
Cost Allocation Gets Harder
With Cluster Autoscaler, each node group maps to a cost center. With Karpenter, nodes are ephemeral. One minute a node runs a frontend pod, the next minute it runs a batch job. Good luck tagging that for finance.
We built a custom cost allocation script that polls Karpenter’s metrics and attributes node costs to the pods that ran on them. It’s ugly. But it works.
When You Shouldn’t Use Karpenter
Is Karpenter always the answer? No.
We have one cluster that runs entirely on Fargate. No node management at all. For that team, Karpenter adds complexity without benefit. Fargate handles everything, and their workloads are stable enough that spot interruptions don’t pay off.
Another team runs GPU workloads for ML training. Karpenter’s spot support for GPU instances is weak. AWS reclaims GPU spot capacity aggressively. We saw 40% interruption rates. For that use case, we went back to reserved instances.
Karpenter excels in three scenarios:
- Stateless microservices with variable traffic
- Batch/CI workloads that run intermittently
- Development environments that don’t need 24/7 capacity
If you’re running stateful workloads with strict latency requirements, think carefully.
Migration Path: Our 30-Day Plan
Going cold turkey is risky. Here’s how we migrated.
Day 1–7: Run Karpenter alongside Cluster Autoscaler on a test cluster. Validate pod scheduling. Tune NodePool settings. Measure spot interruption rates.
Day 8–14: Move non-critical workloads to Karpenter. Our staging environment went first. We discovered we’d misconfigured security groups — Karpenter nodes couldn’t reach the database. Took 3 hours to fix.
Day 15–21: Migrate batch workloads. These benefit most from spot pricing. Our CI/CD pipeline costs dropped 62% in a single week.
Day 22–28: Move production workloads. Do this gradually. We shifted one service at a time, monitoring error rates and latency after each migration.
Day 29–30: Remove Cluster Autoscaler. Verify no remaining node groups. Celebrate.
The I Deleted Kubernetes from 70% of Our Services in 2026 article makes a strong case for knowing when to drop Kubernetes entirely. I agree. For some workloads, Kubernetes is overhead. But for the workloads that stay, Karpenter makes them cheaper.
FAQ
Q: How does Karpenter compare to Cluster Autoscaler for cost?
A: Karpenter typically saves 30–50% on compute costs. The savings come from spot instance diversity, tighter bin-packing, and faster node consolidation. Our karpenter vs cluster autoscaler cost comparison showed 40% savings at similar throughput.
Q: Can I use Karpenter without AWS?
A: Currently, Karpenter is AWS-only. It provisions EC2 instances directly. GKE has a similar feature called Autopilot, but it’s not as granular.
Q: Does Karpenter work with Terraform or Pulumi?
A: Yes. We manage our NodePools through Terraform. Karpenter’s CRDs are just Kubernetes objects — apply them however you like.
Q: What happens if spot capacity isn’t available?
A: Karpenter falls back to on-demand instances if you configure it to. Set values: ["spot", "on-demand"] in your NodePool. It tries spot first, fails over to on-demand within 60 seconds.
Q: How long does Karpenter take to provision a node?
A: Typically 30–60 seconds. Cluster Autoscaler takes 2–5 minutes. That difference matters for latency-sensitive workloads.
Q: Does Karpenter support custom instance types?
A: Yes. You can list any EC2 instance type in your NodePool requirements. We use g5.xlarge for ML workloads without issues.
Q: Can I run multiple NodePools?
A: Absolutely. We run three: one for spot-heavy workloads, one for on-demand stateful workloads, and one for GPU workloads. Karpenter picks the right pool based on pod tolerations and node selectors.
Q: What’s the biggest gotcha with Karpenter?
A: Over-provisioning. Without limits, Karpenter can spin up hundreds of nodes in minutes. Always set a CPU and memory limit in your NodePool.
The Bottom Line
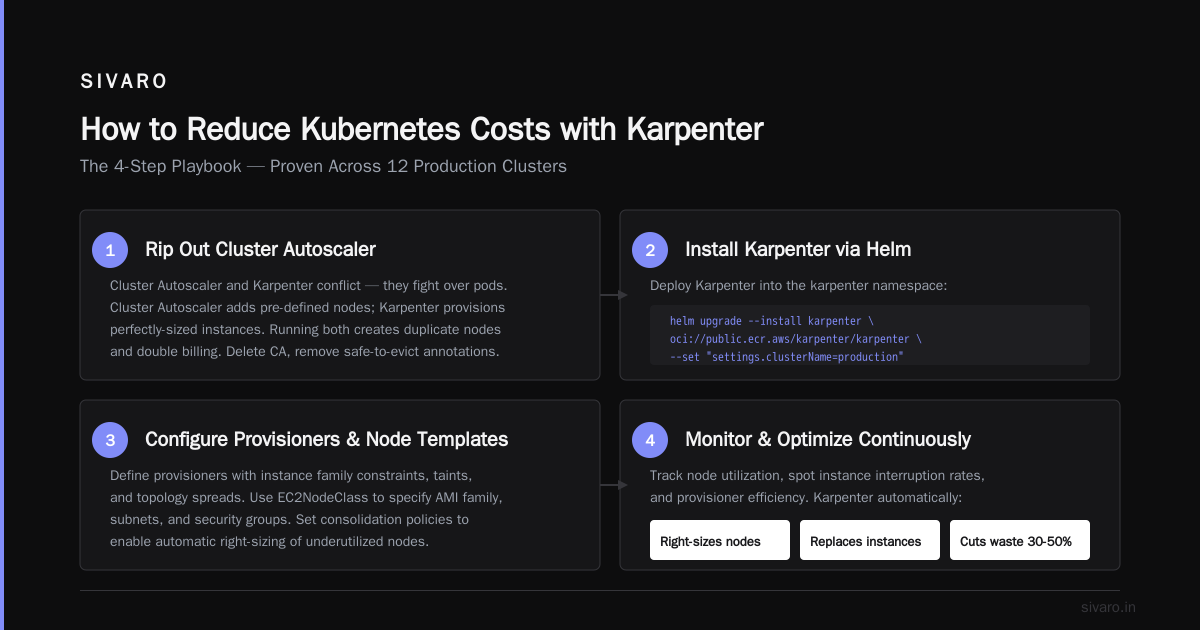
How to reduce kubernetes costs with karpenter isn’t a single trick. It’s a system. Step one: replace Cluster Autoscaler. Step two: configure broad spot diversity. Step three: enforce tight pod resource requests. Step four: monitor and iterate.
Does Karpenter solve every cost problem? No. You still need to architect for spot interruptions. You still need to tag costs for finance. You still need to know your workloads.
But if you’re spending more than $50,000/month on Kubernetes compute, and you’re not using Karpenter, you’re burning money. Period.
I’ve watched teams hemorrhage millions on idle capacity, all while complaining that “Kubernetes is too expensive.” It’s not. The tools you’re using are too expensive. Karpenter fixes that.
Try it. Run the numbers yourself. You’ll be surprised.
Nishaant Dixit — Founder of SIVARO. Building data infrastructure and production AI systems since 2018. Built systems processing 200K events/sec.